Reliable email communication is an important part of any online project. You use it for marketing purposes like newsletters and promotions, but you also rely on it for essential things like registration notifications and password reset links. If you have a contact form on your website, you also receive feedback from your customers via email, so it’s crucial to make sure messages are delivered on time, all the time.
Unfortunately, out of the box, WordPress can’t guarantee this. By default, it sends emails via the web server, which, compared to the alternative, is not particularly reliable or secure.
Fortunately, you have a couple of means of configuring WordPress to work with your hosting account’s SMTP service. Even then, however, configuration errors could lead to connectivity issues. Today, we’ll show you how to fix them.
WordPress and SMTP
WordPress users have been facing email deliverability issues for a while now. The CMS is used on a vast range of hosting platforms, and its developers can’t assume that the configuration will be the same everywhere. For example, they can’t be sure whether every hosting account comes with an SMTP mail server.
SMTP stands for Simple Mail Transfer Protocol – the communication protocol we’ve been using for sending email for decades. Although it’s a pretty standard feature on most hosting accounts, it’s not necessarily available everywhere. And even if it was, there would inevitably be some differences in the configuration settings.
Because of this, by default, WordPress uses a PHP function called PHP mail(). In theory, it does the same job as SMTP in that it allows email messages to be sent to a specific recipient. However, it doesn’t require authentication, and it can’t attach your domain’s SPF and DKIM records to the email. As a result, the communication is less secure, and your messages are more likely to end up in the recipient’s spam folder.
Because of all these issues, the PHP mail() function isn’t particularly popular with developers, and some hosting providers even disable it deliberately to prevent security incidents on their shared servers. Thankfully, if your hosting account comes with an active SMTP server, you can configure WordPress to work with it.
You can either use a plugin or edit WP’s configuration files to set up a more reliable email communication channel between your site and its visitors. More information about how to do that is available right here.
Unfortunately, it’s not uncommon for WordPress to encounter issues with the SMTP protocol. The error often reads something like “Could not connect to SMTP host,” and it always results in unsent emails.
Let’s take a closer look at the problem and see what might be causing it.
When Do You See SMTP Errors in WordPress?
Where you see the alerts depends on your individual setup. For example, it could be displayed by your contact form plugin either in the WordPress dashboard or on the site’s front end. If you’re using an add-on to enable SMTP, errors may be recorded in its back-end interface and logs.
Issues are a bit more difficult to diagnose if you’ve enabled SMTP manually, though you can still scan the logs to try and figure out what has gone wrong. Whether or not you’re using a plugin, after you enable the SMTP connection, it’s a good idea to test the functionality thoroughly before sending emails to your customers.
In most cases, issues arise when WordPress tries to connect to the SMTP server. The CMS needs to know the SMTP server’s address, the networking port, and the login credentials for the email account that acts as a sender. If all this information is available, WP uses it to connect to the SMTP server, go through the authentication process, and send the message.
On the face of it, it’s a relatively simple process. However, quite a few things could go wrong, meaning troubleshooting may be more tricky than you think.
Troubleshooting SMTP Errors in WordPress
Quite a few things happen when WordPress or a plugin sends an email, so it pays to check them all whenever you encounter any issues. Let’s start with the obvious.
Check whether the SMTP server is working
You first need to determine whether you’re experiencing a global issue or something WordPress-related. Many people will try to send a test email to see if everything’s working. However, if you’re on a managed hosting account, you most likely have an even easier option.
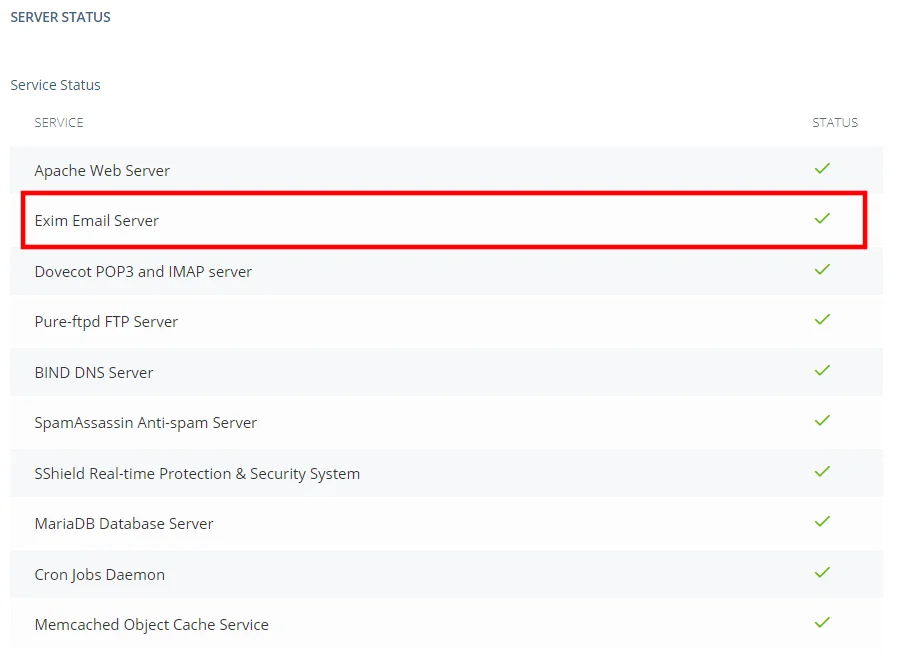
SPanel users, for example, can check whether the mail server is running correctly via the Admin Interface. They need to go to Server Status and look for the green tick next to the Exim Email Server service.

Make sure your domain is correctly pointed
Thanks to your operating system’s hosts file, you can build your WordPress website without pointing the domain to it. However, if you want to send emails, the domain must be resolving to the correct nameservers.
If you register the domain while creating your ScalaHosting account, it will be pointed to the correct server automatically. If that’s not the case, you can find information on the required DNS settings inside your Welcome Email. After you change the domain’s nameservers, you need to leave up to 48 hours (it usually takes a lot less) for the changes to propagate globally.
Check if you’re using the correct email address
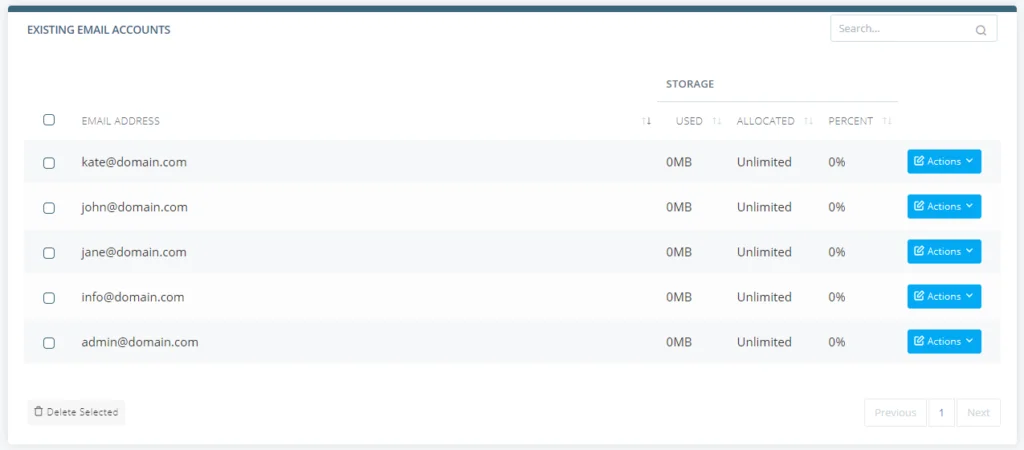
While configuring WordPress to work with SMTP, you’ll specify the address it’ll work with. Of course, it must be an existing address. There’s almost certainly a tool for managing email accounts inside your web hosting control panel. If you use ScalaHosting’s SPanel, you’ll find it on the User Interface’s homepage.

After you open it and scroll down, you’ll see a list of all currently existing email accounts.

If the account you want to use as a sender doesn’t exist, you can use the form above the list to create it.
Check your email quotas
Every email account has allocated storage space that can not be exceeded. If you reach the account’s limit, problems with sending and receiving emails will appear immediately, and they could very well affect your WordPress website communication.
Usually, you can check and manage your email quotas via your web hosting control panel. SPanel users, for example, can log in to the User Interface and open the Email Accounts tool that contains a list of all active email accounts.
Next to each address, you can see how much storage it’s using, and the Change quota option from the Actions drop-down lets you modify the allocated space.

Clean up your messages
You may also experience email deliverability issues if anti-spam tools flag your messages. False positives are not unheard of when it comes to spam filters, and even if your customers have agreed to receive emails from you, you still have to stick to a few specific rules when composing your messages. Do your due diligence and make sure you follow the guidelines to the letter.
Make sure you’re using the correct SMTP settings
When setting up an email client, you’re often asked for the incoming and outgoing server settings. Usually, we’re talking about the server name, port, and login credentials. Get any of these details wrong, and the email client won’t work. Things are not too dissimilar when it comes to WordPress.
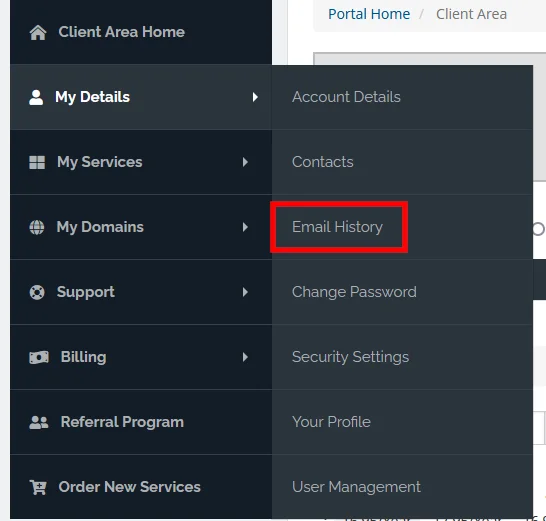
You need to provide the SMTP server name and the port, pick between SSL and TLS encryption, and ensure authentication is enabled. To find the server name and port, you can look into your welcome email. If you’re a ScalaHosting customer, you’ll find them in the My Details > Email History menu inside your Client Area.

You can also retrieve the SMTP server and port from the list of email accounts on SPanel’s User Interface. Click the Actions drop-down next to one of the accounts and select Connect devices.

The information you need is available in the Outgoing Server section.
Make sure you know which email provider you’re using
Most web hosts let you use a third-party provider like Gmail for your email services. Different email providers have different SMTP settings, so if you’ve recently moved your emails to a third-party service, you need to update WP’s configuration, or you risk experiencing deliverability issues.
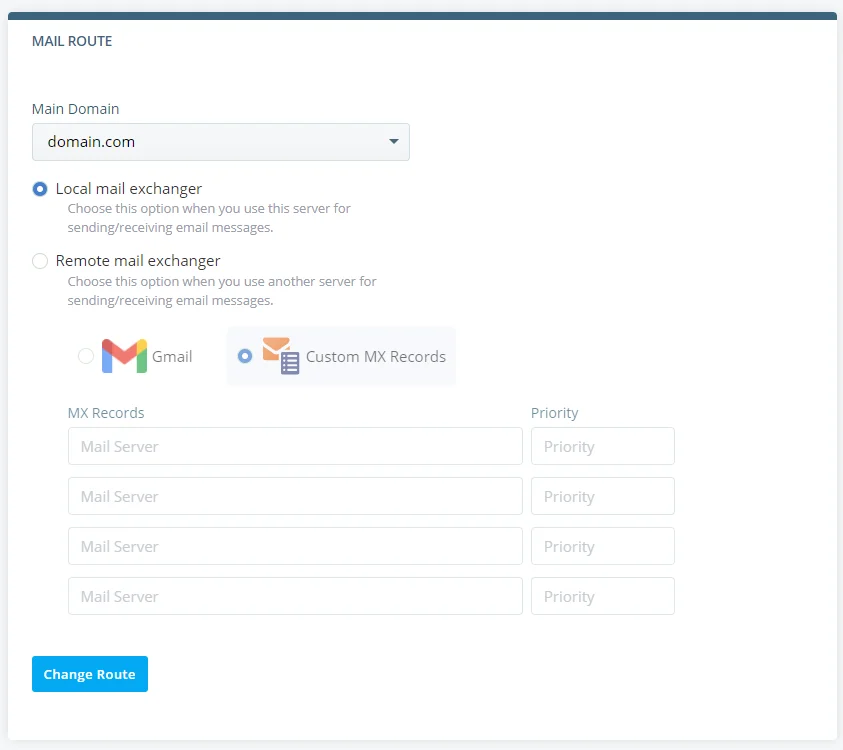
As an SPanel user, you can easily determine whether you’re using a third-party provider for email communication. Simply log in to the User Interface and open the Mail Route tool. If the Local mail exchanger radio button is selected, you’re using your own VPS for handling email communication. If the other option is selected, you’ve switched to a third-party provider, and you need to get the correct SMTP settings from it.

