How to Manage IP Addresses on Your VPS
Virtual Private Server (VPS) hosting is perhaps the least understood hosting option for those new to website building. While the term may seem a little intimidating, the concept behind it is simple, and it has clear and distinct advantages over shared hosting.
Typically, VPS is the next step forward for those who are either seeking an upgrade from shared hosting or simply want to build a site that is more focused on performance and security. Once you activate the service, its scalability makes it useful for a long time after.
Before moving to a virtual private server, though, there are some technical details you should be aware of. Where shared hosting allows you the luxury of ‘ready to use’ environments, a cloud VPS may require some configuration.
This article will outline how to configure a VPS account to handle IP addresses (either the default or additional IP addresses).
What is an IP Address?
The IP, or Internet Protocol, address is a series of numbers that identifies each individual device on a network. Each IP within the network must be unique. Because of that, there are typically two sets of IP per device – an internal IP and external IP.
The internal IP is the number assigned to your device on the local network. An example of a local network would be the devices linked within your home under the umbrella of (normally) your router.
The external IP address is assigned to you by your Internet Service Provider (ISP) when connecting to its servers for Internet access. There are two types of external IP which are IPv4 and IPv6.
Originally, IP addresses used the IPv4 format, which meant each address was made up of four sets of numbers. With the increasing number of connected devices, IPv6 was introduced, which expanded IPv4 to use sets of six digits.
Your host will assign your VPS account an IP address since it is essentially a device (even though it’s virtual) connected to the Internet. You can also get additional IP addresses as an extra.
How to Find the IP of your Website?
The IP address of your website is typically provided to you by your web host so you don’t really have to search for it. After you sign up for a web hosting plan, details of the account will be sent to you (typically via email).
Among those details will be the IP address you can use to access your web hosting account. Until you link a domain name to that IP address, you will have to use it to log in to your web hosting control panel.
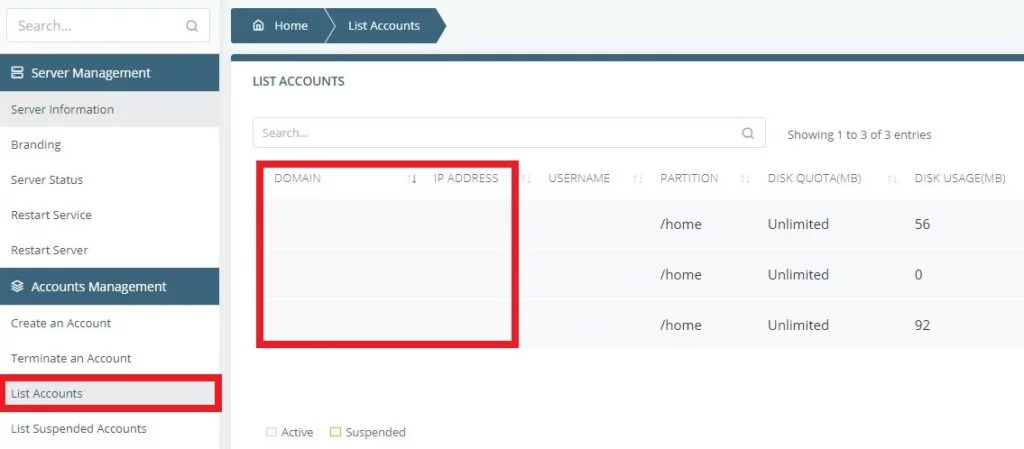
If everything has been set up for you already, you can also find your IP address by logging in to your SPanel Account and selecting the ‘List Accounts’ option.
Why Websites Should Have Dedicated IP Addresses
Typically for shared hosting, hundreds of websites will share a handful of IP addresses. This may cause problems for some users. If some of the accounts on the server cause problems and get the IP address blacklisted, other accounts will be affected.
This is one of the advantages that virtual servers have over the shared hosting configuration. VPS hosting comes with its own dedicated IP address. In some cases, the host may provide more than one per account, or you can opt to purchase additional IP addresses.
IMPORTANT: ScalaHosting Managed Cloud VPS hosting plans come with one dedicated IP address per plan for no additional payment and professional support from our trained operators.
Learn more about dedicated IPs in this helpful Knowledge Base article.
IP Addresses and Domains in VPS and Their Proper Configuration

SPanel Domain Management Tools
Once you’ve created an account in the SPanel control panel, you’ll need to log in to it to manage the hosting for that account. During the creation process, you will have assigned a domain name to the account. When logged in, you can also manage addon domains, subdomains, and use the DNS editor.
The Addon domains tool will allow you to create several complete websites using the same account. This can be useful if you plan on hosting separate sites under a single VPS instance. All you need to do is click the Addon domains menu and specify your name along with its root folder where you want your files to go.
You can use the Subdomain tool to organize websites into separate folders, each handling different sections of your site. All of this sits under your main domain name.
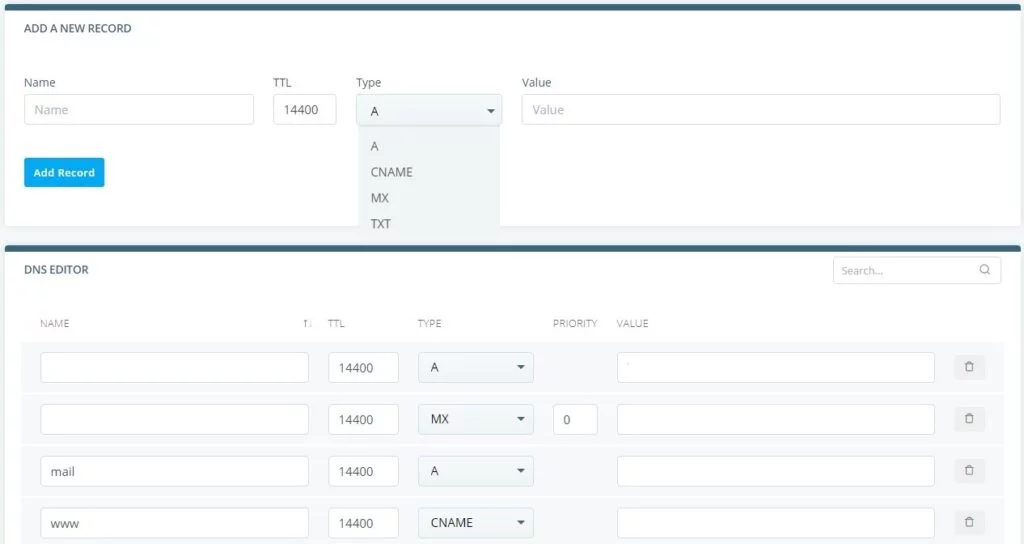
The DNS editor is where you specify the domain name records for your account. Here you can add, delete or modify DNS records. To point your main name to the server, you need at least two A Records or one A Record and a CNAME Record.
Example A (two A Records):
| Name | TTL | TYPE | VALUE |
| test.com | 14400 | A | 123.123.123.123 |
| www.test.com | 14400 | A | 123.123.123.123 |
Example B (one A Record and one CNAME):
| Name | TTL | TYPE | VALUE |
| test.com | 14400 | A | 153.92.211.25 |
| www.test.com | 14400 | CNAME | example.com |
Along with these basics, ScalaHosting VPS customers can also use the DNS editor to configure other aspects of their accounts. There are quite a number of DNS record types for various uses. For example, MX records for email routing, TXT records for technical use, and more.
How to Change the IP Address of your Website in ScalaHosting?

SPanel DNS Editor
DNS is the link between your domain name and website hosting. If you’re shifting to a new web host or even server, you may find yourself having to point your domain name towards a new IP address.
To do that, you just need to make use of the DNS editor, as discussed above. To change the IP address of your online project, edit the VALUE of the DNS records you specified before. Following the example given in the previous section, you can modify “123.123.123.123” to whatever new IP address has been provided to you.
IMPORTANT: Please note this is a very specific function that is hardly ever used. There are scenarios under which changing your website IP may be important, such as moving away from a blacklisted IP address or even an entire IP range targeted for frequent cyberattacks.
Otherwise, unless you’re planning to move from host to host often, you’ll most likely make use of the same IP for extended periods of time.
How to Manage IP Addresses on your VPS Server with ScalaHosting

ScalaHosting VPS clients get a single dedicated IP address for free. Because of this, IP address management is simple since they will follow the IP address of your main account. You will need to click on the List Accounts menu in the SPanel left navigation bar to observe this.
Once that is selected, you can see a list of all the VPS accounts you’ve created so far, along with other details, including the attached domain name and IP address. However, you will not be able to modify the IP address assigned (since there is only one).
The only changes you may be able to make is to modify the link between domain name and IP address, as discussed in the section above. An alternative method of doing it would be using a Content Delivery Network such as Cloudflare. If that was the case, you could modify settings using Cloudflare DNS management.
IMPORTANT: The provided instructions and screenshots are valid for hosting services on a Linux operating system with SPanel. Instructions for Windows users may differ.
Conclusion
Managing a Virtual Private Server account isn’t very difficult for those who know how networked servers are configured. Please note that configuration details and instructions can sometimes be tricky. If you’re unsure how to configure your account, it is best to look towards Managed VPS hosting to benefit from our top-level support.
How To Point a Domain Name To a Web Hosting Provider


